Herbal Wreath Tutorial
There’s nothing like the fragrant aroma of your own handmade herbal wreath to great you at your front door everyday. The style wreath I made is simple yet beautiful and can be hung inside your home or outdoors.
Because I used fresh botanicals I grew myself or that I foraged on our property, this project cost significantly less than store-bought wreathes. This herbal wreath is made with fresh cedar clippings, rosemary, sage, eucalyptus and mint. No glue guns needed, friends. Just wire.

You Will Need
- Grapevine or wire base (I have used both but found the wire to be easier to work with when attaching small sprigs and stems)
- a base evergreen such as cedar, blue spruce or juniper (fresh)
- additional botanicals of your choice (I used fresh rosemary, sage, lavender, mint and eucalyptus;)
- detail pieces such as dried floral, citrus, etc.
- a pair of snips (I recommend these)
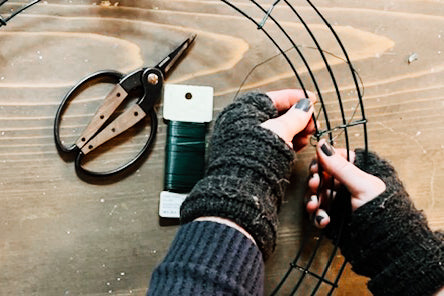
- florist wire
- ribbon or twine for hanging
- gloves to protect your hands from scratches and pokes while working with the plants and wire
For a list of my favorite botanical crafting supplies and tools, visit my Floral Arranging shelf on Amazon.
To Make
- Attach the end of your florist wire to your base. Do not cut it. Leave it connected to the roll and continue to unroll as you need it.
- Create your first mini bundle of herbs starting with the evergreen on bottom, then clustering your herbs so they are all visible and fanned out slightly. Hold the herb stems together at the bottom with your thumb and place them on the base. Wrap the wire around the bottom of the herb bundle tightly 4-5 times where your thumb was holding them together. Do not cut the wire. Just continue to unwind it while securing the herbs to the base with it.
-
Make a second mini herb bundle just as you made the last, only this time you will place the bundle just below the first one, layering the herbs so that the “fan” of the second bunch is covering the wired base of the first bunch you attached. Continue this step until the entire wreath is filled. For an 18" base, I used 12 bundles. Twelve is a good starting point, however the number of bundles you need will vary depending on how large your bundles are and how much (or little) you overlap each bundle when you attach them to the base.
-
When you are about to attach the final herb bundle, tuck the base of the bundle underneath the fan of the very first bundle you attached. This will complete the circle and ensure that all the florist wire is hidden by foliage. Then, give the wire a bit of a tail and cut it. Secure the tail to the back of the wreath, winding it tightly.
-
Add your details by attaching them with more florist wire and a ribbon (or twine) for hanging.